Romi Vision Programming
In this module we'll learn how to use the Raspberry Pi camera that's attached to the Romi. We'll get it to stream camera images to Shuffleboard, and use the Robotpy Network Tables to send data to the Simulator and to your robot program. Lastly, we'll learn how to overlay a cross on the image to identify its center. This will be a useful technique in subsequent learning modules to track image features that are captured by the camera.
The camera program uses the open source software called OpenCV and can be written in Java, Python, or C++. We're going to use the Python programming language since most of the OpenCV programming examples that you'll find online will use Python, so if you run into any problems with your program chances you'll find the solution in Python. The camera program uses the CameraServer libraries from Robotpy.
The following diagram shows the software components that we're going to use and how they're deployed between the Romi and your development PC.

Test the Camera Connection
Ensure that the camera is connected by going to the Vision Settings section. Under the USB Cameras panel it should show the Raspberry Pi camera as connected. Clicking on the Open Stream button will open another browser tab with the camera stream. The URL will be http://10.0.0.2/1181 or http://wpilibpi.local:1181. Sometimes you may have to do a page reload on the 1181 URL to get the stream to display.

Development Setup for Python
In order to use Python in VSCode you will need to install the Python IntelliSence plugin.
Install robotpy on you computer:
On Mac or Linux pip3 install robotpy
On Windows py -3 -m pip install robotpy
Install cscore library:
On Mac/Linux pip3 install robotpy-cscore
The Basic Vision Program
For this lesson we'll use the BasicVision project. Clone this project to VSCode. The BasicVision project uses the WPI example project RomiReference to run and view the camera data in the Simulator and Shuffleboard. The only change made to this code is to add a tab for Vision to Shuffleboard. This is done in the RobotContainer class.

The python code for running the camera has been included in this project so as we have all of the software components in one place. This program is explained in the next section. You'll upload the camera program to the Raspberry Pi on the Romi in a later step.
The Python Camera Server Program
Before we start programming lets look at the general structure of the camera program. The main idea is to get an image frame from the camera and put data regarding the frame into the Network Tables. Our program running on the laptop will simply display the data to Shuffleboard.
The camera program can also send the image frames over to Shuffleboard in the form of a video stream. Before sending the frames the camera program can overlay them with useful visual information such as a center line.

Explain how the program works...It makes use of the Camera Server class from the WPI Library.
Lab - Basic Vision Programming
In this lab you'll upload the Python vision program that was explained in the previous section and view the camera output stream as you drive around the Romi. The lab has two tasks:
- Upload the Python vision program.
- View the camera stream in Shuffleboard as you drive Romi.
Upload Python Vision Program
You can't run the camera server code on your laptop since it's not currently supported. You have to upload it to the Raspberry Pi to test it. In a terminal (Powershell):
cd ~/Documents/RomiExamples/BasicVision/Vision. If you opened up a terminal from VSCode then you should only need tocd Vision.- The python program has multiple files so you need to upload them all. This is done with a zip file. Run
python build.pyto build the zip file. Depending on how Python is installed you may have to typepython3. The zip file will be calledwpilib.tar.gz. - On the Romi WPILibPi.local webpage. Go to Application.
- Put Raspberry Pi file system into Writable mode.
- In the Vision Application Configuration section select "Uploaded Python File" from the dropdown menu.
- Make sure that file Extract is selected.
- In the File Upload section click the Browse button and select the file
wpilib.tar.gzfile that you created in step 2. Click the Upload button.

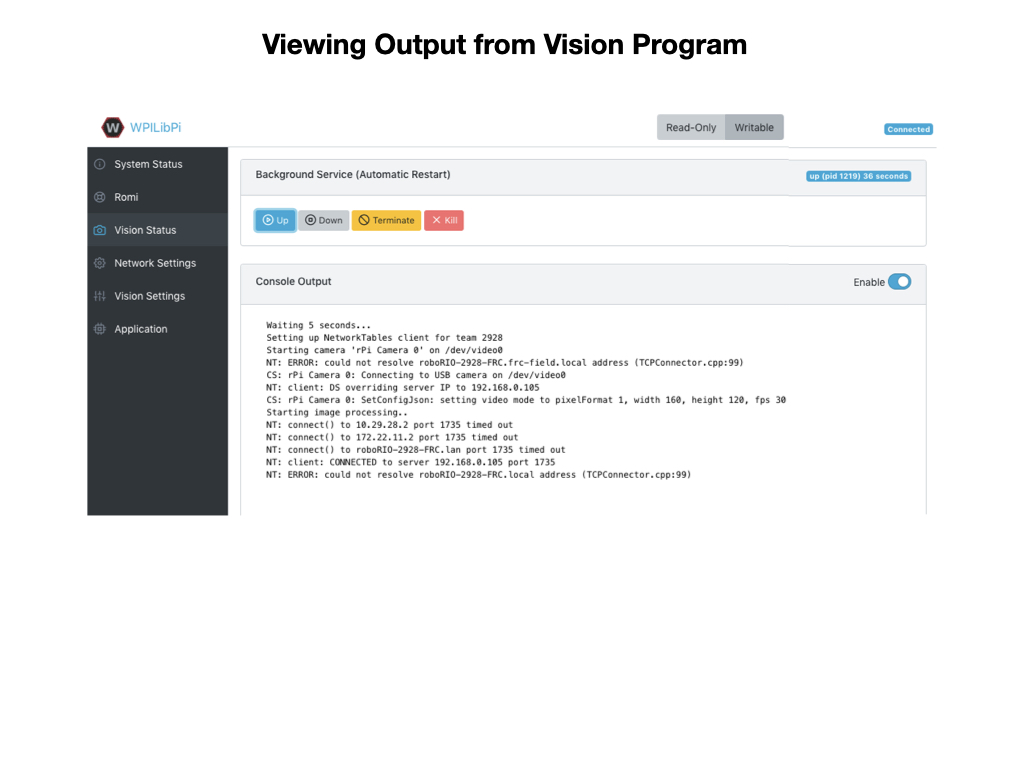
To confirm that the vision program is running you can view the output from the Vision Status tab. Make sure that you enable console output.
View Camera Stream from Shuffleboard
-
Run the your java program from VSCode by pressing the F5 key. In the Simulator you will see the Network Tables showing the
targetDatacoming in from the python camera server program. In later modules you will use this data to control the robot, but for now it just shows the coordinates for the center of the image. -
Start Shuffleboard and click on the Vision tab that was created from your java program. It should display the center position of the camera image.
-
Open the CameraServer dropdown. Drag the Target camera stream onto the Vision tab.

- Drive the Romi around to see the changing camera stream.
Note: Shuffleboard uses the Network Tables to display the camera data so your java program must be running in order to see the live camera stream.
An alternative way to view the overlayed camera stream is to bring it up in a browser. The URL is wpilibpi.local:1182/stream.mjpg. The port of the original stream is 1181.
Notes on Restarting the Romi
When you first turn the Romi it will restart with the program that you last uploaded. So if that's what you require then there's no action neccesary. Despite this, the Vision Application Configuration panel will default to the Custom application, even though the Custom application is not running.
If you've switched the application to Built-in multi-camera streaming then you will have to upload your python program again, since it will try to call uploaded.py instead of your multiCameraServer.py program. The the runCamera file keeps getting overwritten so you cannot just upload a new multiCameraServer.py file from the Vision Application Configuration panel. You have to upload your tar file from the File Upload panel.
References
-
Robotpy - Network Tables
-
FRC Documentation - Network Tables
-
Amazon - Network Tables
-
FRC Documentation - Camera Server
-
FRC Documentation - Vision with WPILibPi
-
FRC Documentation - GRIP documentation
-
Robotpy - Camera & Vision
-
Code Example - BasicVision